Thursday, April 6, 2017

Rose Boll 9

So, it turns out that Prairie Star is too demanding to sew straight through. For a break, I've finally made a few more Rose Boll blocks:


This is my red and white version of Bonnie Hunter's Roll, Roll, Cotton Boll. You last saw it on New Year's Day. Since then I've been steadily making the 500 HSTs required. Now that's done and the blocks are coming together fairly quickly. It reminds me of a building project, where for the first half of the project it's just a big hole in the ground, and then all of a sudden it starts growing fast!


These rosy florals are so fun to work with. This dark pink is from Eleanor Burns' Forever Love collection.


I've also used a few fabrics from the Savannah Garden collection from Henry Glass. This red looks even better than I expected cut and sewn.


And this is the main Savannah Garden floral in white. I believe the ditsy red print is from my old LQS, now closed for many years, and the white on white blender too.

I had planned to make the whole quilt from stash. But, it turned out that I had plenty of cream florals, but none of the reds that I imagined. So, woe, a little online shopping was required. I lost my head at Missouri Star, but I'm certainly not having any regrets now! I like all kinds of fabric, but these florals feel like home.

I'll need 25 of these blocks. More to come!

Saturday, April 1, 2017

Made by a Human

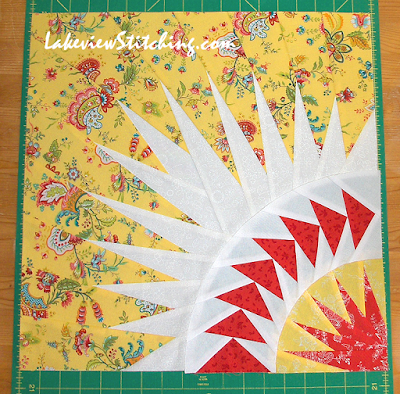
Moving forward with my new colourway for Judy Niemeyer's Prairie Star, the next step is the RS units, or "large corner spikes." I planned out my own cutting instructions, concentrated, and the first one turned out great. Here is the new yellow and white section, laid out with the flying geese and melon spike units that I made a few years ago:


It was a little tricky to manoeuvre the big paper section through the machine, but doable.

The whole project is very well designed, and the instructions are detailed. But, they do frequently say things like "After you pin the papers onto the fabric strips, take the strips and the papers to your machine," as if your cutting table and sewing table are different places. It is all the same table here! It really felt like you need a large, dedicated studio to follow the instructions, and I decided it would be easier to simplify the cutting and strip piece it, instead of using all the cutting templates. Strip piecing is also easier with prints. I measured off the pattern, and rough cut everything without even ironing the fabric:


I iron the strip just before I sew it on, since the iron is right beside me anyway. And then I iron the seam open. The advantage of the strip is that you can sew along either side, and you don't have to worry about the right side triangle or the left side triangle. Everything always fits.

Well...everything always fits as long as you stay focused! You still have to take care pinning the strip.


This is the one segment where the strip has to extend well past the end of the seam, and I forgot. Those are very tight, small stitches, and I didn't want to unpick it. So I cut off the far end of the strip, which was now too long, and sewed it to the short end, not through the paper. I think it did the job:


If I hadn't fixed it, there would have been just a tiny quarter-inch hole there. You can see the seam allowances through the white fabric, but to me that was better than the damage I would have done unpicking the seam.

Made by a human! Two done, six of these sections to go. I'm going to do my best to stick with it, because it's not an easy thing to set aside and come back to later. And the warm weather is coming, so I want to finish the top before it is too hot to sit next to the iron. Fingers crossed!
Related Posts Plugin for WordPress, Blogger...