Friday, March 23, 2012

Sashiko Style

This book has been on my list to review since I started doing book reviews.  The Quilt Show is about to do a show that features sashiko, so now seems like the perfect time!


Sashiko Style (Japan Publications Trading Co. & Joie, Inc., 2007) was originally published in Japanese, and this edition was translated into English by Yoko Ishiguro.  As you can see on the cover, it has instructions for 18 traditional and elegant projects.  By far its main strength, though, are the detailed and thorough instructions for how to actually do sashiko.  I bought Paradise Stitched by Sylvia Pippen at the same time as this one, and while she has some really beautiful designs, the instructions are very thin.  So I would recommend this book no matter whose designs you end up trying.

I was very interested to learn that sashiko originated as a counted thread technique, that was done to give additional strength to loosely woven cloth. Now it is more of a decorative technique, and you do not have to count, although this book does give instructions for counting if you want to.

If you have read any of the Japanese quilting magazines, you know how thorough they are with diagrams and photos of the instructions.  This book has the added bonus of being translated into English!   


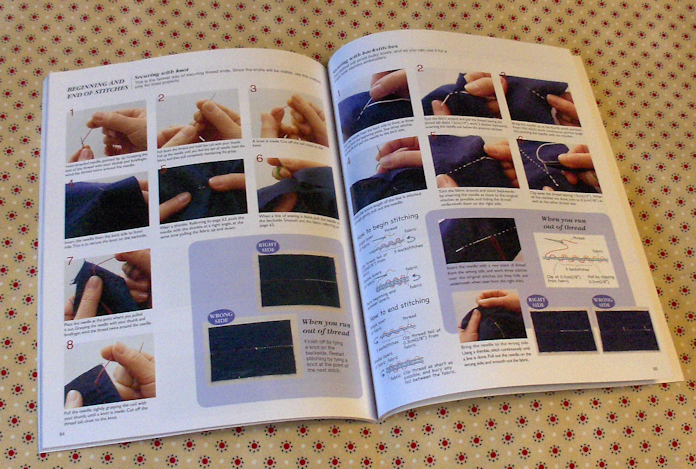
All the basics are covered - starting and stopping the stitching, what do to do if you run out of thread in the middle, preparing the fabric, drafting and marking the designs, all the project instructions, everything!  It also includes several pages that catalog many of the traditional stitching patterns for you to use in your own designs:


Even with all this, it is not a huge book.  There is no fluff.  It has everything you need, and nothing you don't.  It also includes a pull-out pattern at the back for all the projects in the book.

For me though, the biggest payoff was an unexpected one.  I have long wondered how exactly the Japanese do their hand piecing for patchwork.  Have you ever seen it?  It seems so fast and easy.  Here is a video from Yoko Saito's Quilt Party channel:


How exactly is she holding the needle?  The same way you do sashiko!  It is thoroughly explained in this book.  Although I haven't tried it yet, I will soon.  I already know the project I want to do.

So once again, this is another book I highly recommend!

Wednesday, March 21, 2012

Intermission


Breaking my iron on Sunday has really thrown me for a loop!  I have done no sewing of any kind since it happened.  It is ridiculous, because the vast majority of my projects don't require the iron.  But I guess I was finally so focused on Sedona Star that now that it is on hold (again, yes, again), I am having a hard time changing direction.


Mother Nature, however, is having no problem changing direction.  Spring is here weeks early, and as you can see, the evidence is everywhere!

The only thing that feels appropriate for me to do right now is cleaning and organizing, so I've been sorting books and fabrics.  Both are badly needed activities!  Hopefully, at some point during all that my next step will become clear.  :)

Monday, March 19, 2012

Paper Piecing Sedona Star Month 2

If you're wondering where I posted my picture of my completed Month 1 blocks, the answer is that they aren't finished yet!  I am still experimenting with my turned applique by machine technique.  In the mean time, I went ahead with paper piecing Month 2, and showed my practice block yesterday.  The practice block was made with the real fabrics, so you can see where I am going with it.

As I promised yesterday, here is how I altered the Month 2 template to accomodate paper piecing:


I left the image fairly large, so if you click the photo you can see all the details.  Here's a description of what I did:
  1. I assembled the template from plain copy paper and drew on all my revisions.  Then I copy each quadrant onto the Ricky Tims' Stable Stuff.  The edges were trimmed down so that each side, including the centre seam, fits onto just two pages.
  2. I pieced it in two sub-units, sewed the centre seam, and then added the appliques and outer border.  You can see that I extended one side of the centre point both up and down.  I am indebted to TQS member FLAero52 for this idea.  She did it slightly differently, but the sub-unit idea is key.  I added a cutting line on either side of the seam, mainly to remind me that it IS the seam.
  3. I extended the corners of the grey background grid out to the edges, and also added a trim line parallel to the grid on all four sides.  This is to speed the assembly of the templates.  I trim the copies at the trim line, butt the edges against my Olfa mat, and line up the corner extensions at the 0" and 16" marks on the mat.  Then I know for sure that the assembled template is exactly to scale. 
  4. I also added some small lines across the seam line at precise right angles to serve as pin markings when I sew the centre seam.  That seam has to be dead on, or the final shape of the block may be distorted.
  5. The background pieces 4a and 4b are an awkward shape.  Rather than using a very large rectangle and then cutting away most of the fabric, I traced the shapes onto wax paper (freezer paper) to use as pattern pieces.  This allows me to cut the angle for the seam so that the fabric will flip up exactly into the right position.  Yes, it IS tricky.  But it works great once you get it.  Please let me know in the comments if you want to see a picture, and I will take one once I get going again.
I ordered this cute iron from Keepsake Quilting today, and the pressing surface too.  With my small sewing space, I think it will be a better solution than a full size iron.  Maybe there was a silver lining to my misadventure yesterday!
Related Posts Plugin for WordPress, Blogger...