Tuesday, September 27, 2016

It's a Warm Finish!

It's Warm Inside is finally a finished quilt!


This poor quilt has really had its ups and downs. I designed it to be Quilt as You Go (QAYG), with the narrow white cotton sashings. But, between the fluffy flannel log cabin blocks and all the loose batting, it was way too dusty for my allergies. So, I pieced it all together and took it to a longarm rental place to quilt it myself.

Wait for the chorus...


That turned out to be a really miserable experience that started with a friend of the owner setting up a quilt on the machine I had reserved, and which went way downhill from there. I should have walked out right then, but alas, I was not as smart as the song. The clincher was when the owner told me that my quilting idea was wrong and looked bad, when I was about half done. Fortunately, there are other fish in the sea!


But, despite all the hardship, in the end I think it's a likeable quilt. The snowmen are jolly, and the simple quilting works fairly well on the flannel logs. I circled around all the snowglobes in the border, which made them quite puffy:


The fat red binding stands out well too. I had a couple of yards of aqua, white and red Christmas fabric that I think I meant for a border at one time. But it matched perfectly, so I used it on the back here, and filled in the remainder with the leftover snowmen fabrics from the front.


I have Mimi Dietrich's book Happy Endings, which includes this idea for piecing the label right into the back:


Since I had to piece the back anyway, it made sense to me.

So, I'm glad to have it done, only two years later than planned! I'm catching up. :D To see all the posts on this quilt, please click here.

The gnome? He kept his thoughts to himself.


Sunday, September 25, 2016

And Some Dots


It's been two weeks, and I just have a little hand sewing to share today for Slow Sunday Stitching. The day after my last post, I was smoothing out my Gwennie Medallion basket block on the bed for this photo...


...and my back cracked and folded. Two days in bed, two days mostly in bed, but the good news is that I heal well, and the x-rays are clear.

I have not been back on the sewing machine since, but it has given me time to re-think that wavy border. I unpicked it a few days ago. Today, with luck, I will straighten out the sides, re-attach it, and move on to the first border. With luck, I will be appliqueing more olives by the end of the day!

While I was recovering, I did manage a little EPP for Leigh Latimore's Brinton Hall. When you really can't think at all, EPP is the perfect activity! I need 20 rosettes for the first border, and I ran out of plaids. Rather than repeating fabrics, I thought some dots would work:


So that will brighten things up!

I have one more suitable dotty fabric, this blue. Then I think I will have to repeat one of the plaids, probably the bright yellow from the last post.

I am still not 100% decided on the background and floater fabrics, or even on the design. The original Anna Brereton quilt, which inspired Latimore's design, has octagons, and I happen to have suitable octagons in my EPP stash. I've sewn up a few, but the way is still not clear.

But, I have to shelve that for now, because if I have any chance at all of meeting the October 1 deadline for the Gwennie medallion, I have to get back on that horse!

Sunday, September 11, 2016

Fun with Plaid


Now that the centre of my version of Brinton Hall is done (see here), it is time to start work on the first border. Leigh Latimore's design calls for 20 squares of dark beige backgrounds, 8 appliqued with hexagon rosettes, and 12 with eight-pointed stars.

Although the pattern does not say so, I could see in the photos that some of those hexagon rosettes were fussy cut. That seemed like a good plan to me too!


But, the Kaffe Collective fabrics that I used in the centre tend to have a long repeat, and I didn't want to make small holes here and there in otherwise good yardage.

I needed a fabric with a short repeat, and I thought of these printed plaids. They are the Mix It Up collection from Connecting Threads last year, and I bought quite a few! I love plaid.


The centres, though, are Kaffe's Zinnia design, which I had for something else but then didn't like. But, it is perfect for this! I cut 8 hexagon centres for the hexagon rosettes, and 12 circles for the centres of the star blocks.


As I played around with the plaids, I realized that I could cut some of them to make an interior star. It is subtle in this olive green plaid...


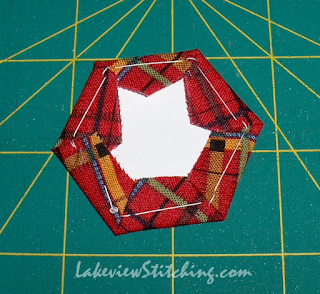
...but I hoped it would be clearer in this red. And, I thought I should take some photos to show how I do it.

I have a homemade cutting template that includes a 3/8" seam allowance. It is important to do the exact same thing 6 times in a row, so make sure you have enough time to do it all at once.


Then something felt wrong when I started basting the fabric to the papers.

Oh no! They don't make stars at all! They go in a straight line!

Why? Because I distracted myself by taking photos, that's why. Pride before a fall...


Fortunately, the seam allowance is so large that I can just turn the paper the way it's supposed to be and baste again.


Here it is fixed. You can see that I still baste with the thread entirely on the back of the paper. I leave the thread in, and just pull out the paper once it is stitched all around. The thread is ancient gritty polyester thread, and it holds really well.


This fabric looked so good that I used it twice.


In fact, I'm loving all these plaids. Even the grey!


And these are the stripes from the same collection. This is the rosette I was starting last Sunday.


I know I have more of these plaids somewhere in my stash. So, I've decided to skip the eight-pointed star blocks completely, and make 20 of these hexagon rosettes instead.

I could even re-purpose the circles I cut for the stars, and baste them to hexagons too!

Here are the first nine rosettes:


Cute, eh? Three more are cut and basted, and then I will have to start digging through the boxes in the basement.

It will still take me a while to finish the rosettes and do all the applique. But, this is the end of the handwork for the quilt, because I'm changing the last border too.

In the meantime, though, please check out all the other hand stitching happening for Slow Sunday Stitching right here at Kathy's Quilts. Happy stitching!
Related Posts Plugin for WordPress, Blogger...