Showing posts with label Hexagons. Show all posts

Sunday, April 17, 2016

All Together Now

Earlier this month I sewed the last two long rows on my Texas Star quilt. Now all 333 stars are joined together:


The bright sun seems to wash out the colours a bit, but I thought it would be a good plan to take a photo before the weeds and ants take hold again on the patio!

I still plan to applique a narrow white border to even out the edges. But it is a nice milestone to get the English Paper Piecing part of the project done. There are around 3200 pieces -- I added it up once, but lost the paper the math was on! By some EPP standards, that is not a lot, but, it's plenty for me! I am glad to have this part done. To see all the posts on Texas Star so far, please click here.

Now I can re-focus on finishing the setting for Best Friends Forever, which is also EPP. Of the 22 BFF blocks, 8 are done...


...and another 4 or 5 are almost done. They are hard to photograph! I have not really looked at this project for about a year now. Seeing it with fresh eyes, I am very happy with how it looks so far. I'd forgotten how pretty the stitcheries are!

Remember this fabric that I bought after Christmas? I was going to cut it up and use it for the pieced background for BFF. But, I've changed my mind on that, again.

Now, for sure, I am going to piece the background with scrappy prints -- mainly light green, and a little pale blue and yellow thrown in.

Each flower block will need 24 scrappy kite shapes to turn it into a large hexagon. It sounds like a lot, but it is actually a simpler plan than some of the ones I've considered!

I know you will laugh, but I've also been considering making this quilt larger. The complete BFF pattern set has 32 stitcheries, and I didn't stitch them all. Since I've decided to make the background scrappy, the project is more scalable, and I may embroider a few more.

To see the posts so far on Best Friends Forever, including all the stitcheries, please click here.
We have company coming this Sunday, but I am still going to try to squeeze in a little sewing on BFF. Maybe start a new stitchery? We'll see. In the meantime, you can see what everyone else is doing for Slow Sunday Stitching right here.

We have just a few flowers in the garden now, but in a week there should be lots more. Enjoy your weekend!


Monday, March 30, 2015

MCH Month 3 Finished

Probably for the first time ever, I have finished a block in the same month that it was released! This is Month 3 of Lynette Anderson's 2015 BOM, My Country House. Of course it helps that it was the easiest month so far, and I simplified it further:


Instead of piecing the heart, I just fussy cut it whole from the same red fabric that I used for the house door in Month 1.

I've had the stems sewn down for over two weeks, but then I waffled quite a bit about how to sew down the hexie flowers. Click the photo to see it larger:


I pieced the flowers with 100 wt silk thread, which is completely invisible. But it felt wrong to use the same invisible thread to applique them down. So I had three options:

  1. Sew down the flowers invisibly with the 100 wt silk.
  2. Use cotton thread for the applique, same as the stems and heart. But, should I then change colours for the coral and orange hexagons?
  3. Use perle cotton and a running stitch for the applique, same as I did for Jacks and Cats. But what colour should that be? Yellow, orange, coral, or even black?

I do not believe that an invisible applique stitch is the only right way to applique. Rather, I think it depends on the type of project and how it will be used. In this case there will be a lot of wool applique, which I like to whip stitch down with a single thread of embroidery floss. And I appliqued the stems with cotton and a regular, visible applique stitch, so they would relate to the leaves.

Finally I chose to use pink perle cotton and a running stitch to applique the flowers. I had some size 8 perle cotton in my stash, so I used that, but ideally I think a narrower size 12 would be better. I think the pink blends well with the coral and orange, and it will look nice as a big stitch quilted detail on the heart, once I get that far.

I also waffled about whether to stitch the vein on the leaves, because that is a big commitment for the 48 leaves still to do in Month 2. But, since I went with the perle cotton on the flowers, I decided it would be a nice touch for the leaves. Fortunately, I had the perfect colour in my stash! It is also size 8, DMC 580 perle cotton, and back stitch. And it didn't take long at all.


At 3/4 scale, I was just able to squeeze the 40.5" block into one width of fabric. I still need to finish the trees on Month 1, and then I'm going to move ahead to all the pieced blocks. There's a postage stamp border between Month 1 and Month 2, and I have the idea that it will be more efficient to make the stamps from the leftovers of the pieced blocks. I'm not sure it really is efficient, but I will try!

Thursday, March 12, 2015

Final Line Up for BFF

Last time I posted about Best Friends Forever, I said that 23.5 of the stitcheries were done. Before I did the final wash and cut, I decided to finish up that last ".5:"


And it's a good thing I did! Look what happened here:


I used the acrylic cutting guide from Paper Pieces to centre each stitchery on the 3.5" hexagons I'm using for the setting. It turns out that these two motifs, the basket and the house, were printed too close together. It's the only place I had this problem for the whole quilt -- usually there was 1/2" or more in between.

I'm not upset, because I wasn't a big fan of the basket anyway. When I stitched it I worried that it was too big, which it isn't. But I guess I knew something was wrong!

I always wash my finished stitching (cross stitch too) in plain unscented dish soap (environmentally friendly) to get out any oil or dirt. It works great, and I've never had any colour run. The linen was hung to dry, and then ironed from the back on a clean pressing cloth:


Cute, eh? Even the grunt work has been fun on this project.

Then all the motifs were cut, backed with muslin, and basted to the big paper hexagons:


I miss stitching these, actually. It was fun to come up with different stitches and colours for each one. The stitching for Down in the Garden, which I'm doing now, is not as challenging and is starting to feel dull. I may need to add something else to the mix!

Anyway, here's a reminder of how the BFF setting works:


As fun and exciting as this all looks, I'm not sure I can work on this and Texas Star at the same time without a total English paper piecing overload. And I've kind of set myself a schedule for Texas Star... So it may be a while before you see any more.

Finally, one problem I often have with internet photos is that you lose the sense of scale. So, here's a last photo with one BFF block, one Texas Star, and one of the hexie flowers from My Country House:


Is it different than you thought? They are 3.5", 5/8" and 1/2" hexagon centres, respectively. I should have put a ruler in the photo too. Anyway, lots to do!

Monday, March 9, 2015

Country Flowers


Although I've been quiet for a couple of weeks, I'm still sewing! A little here, a little there. Here's a preview with the two kinds of flowers for the TQS 2015 BOM, My Country House by Lynette Anderson.

The "fried egg" flowers are felted wool from Wooly Lady. I love the colours! Felted wool is my big secret plan to minimize the difficulty, especially with the 3/4 scale, and stay on schedule with this BOM. All the critters will be wool.

The hexies are 1/2", which I decided would be the best fit for my smaller scale version of the quilt. The coral and orange fabrics are long time stash inhabitants, and the yellow and green are both fairly new Quilter's Candy Basics from Connecting Threads. There will be a lot of CT fabrics in this quilt. They seem to match the simple feeling that I want for this project.

Month 3 will probably be the first month to be completely finished. I plan to make good progress this week!

Tuesday, February 24, 2015

Texas Star Schedule


Paulette made me laugh, somewhat hysterically, the other day when she asked her readers if we were ahead of schedule on any of our projects. We all know I am not good with schedules!

But my one successful schedule so far was completing all the individual stars for this project, Texas Star. Since then I have been sewing them together, on and off, and I have a good sense now of what is involved. So, a couple of weeks ago I did set up another schedule to get them all sewn together.

Here's my progress so far, the first 99 of the 333 total stars:


My plan is to add 12 stars per week, which should see them all joined by the second week of July. It seems far away now, here in the deep freeze, but the key to success is to make the schedule really easy. A few stars here and there in my spare time at the end of the day.

I have been really surprised by how soft the top feels! It's difficult to photograph "softness," but I've been trying:


I've realized that it's the English paper piecing that results in such a soft, smooth surface, because all the seams are left open:

Wrong Side
English paper piecing is definitely much slower than regular hand piecing, but I am so impressed with the result! I had been thinking that Best Friends Forever, which will also be English paper pieced, would be my last project using that technique. But now I think the door is open to another one, down the road!

Sunday, December 14, 2014

Near the End on BFF

At the end of Ink Week, one thing that became clear to me was that I was ready to close out my current stitchery project, Best Friends Forever by Rosalie Quinlan. Now that all the individual stars are finished for Texas Star, I am also ready for my next English paper piecing project, which is going to be the setting for BFF. So I have two strong reasons to finish the stitchery portion of this project!


Today I have just finished the telephone, which is part of a motif from Month 6, and I'm about to turn on the tv and backstitch all the lettering while I catch up on a few episodes of CBC's Strange Empire.

Since it's Sunday and I haven't linked to Slow Stitching Sunday in ages, I thought I'd do that too! Recently it's seemed like Sundays have been a good day to devote to the sewing machine, but today I'm going to kick back. Plus, I'm keen to finish this up now!

The original, eight-month Block of the Month had 32 hexagon motifs. As I'm not doing them all, a smaller but still nice layout will be 22 hexagons, roughly like this:


Including the telephone, I need three more, so that's the plan for the next while. My cross stitch snowman is back on hold, by the way. My cross stitching neurons are rusty, and I was making mistakes all over because I was rushing it. BFF may not be Christmas-y, but it will sure feel like a nice gift to get this phase of the project done!


Thursday, December 4, 2014

333 Finished Stars

Yesterday I finished the last star for my Texas Star quilt:


I decided to use this low volume print, called "Warm Wishes," for my last three stars. As I got to the end I realized that I had some of my least favourite fabrics left, and I thought the last star should be nicer. I had a strip of this set aside for the binding of Mod Trips, so I cut it up and used it here instead. Against the white background they will almost disappear, and I like the idea of a few "ghost" stars among the rest.

I've been adding three background diamonds to most of the stars as I sewed:


Now I can sew the stars together without the boredom of all the white pieces. I've already made a start:


Back in August I made myself a schedule of six stars per week, in order to finish them all this year. I am so pleased that I have managed to stick to it! Some weeks I was ahead of schedule, and some weeks I had to catch up, but in the end I am right on time. If you missed some of the Ticker photos, here they all are again:


In the new year I may make another schedule for the rows, but I'll see how that looks after the holidays. After working on these for so long, it feels a little empty to think they are all done. I'll have to regroup a little now, and think about what the next big project will be. I put aside the baskets in order to finish these, so I may go back to those. We'll see!

Tuesday, August 20, 2013

Hexie Pincushion


Ever since I started English paper piecing, over a year now, I've been wanting a small, stable pincushion to park my threaded needle while I prepare the piece for stitching. I looked at a lot of pincushion patterns, but nothing seemed right. Yesterday I was looking at old cross stitch patterns when I found this pincushion pattern in the July 1997 issue (Number 75) of Needlecraft magazine from the U.K. They made theirs from 1" hexagons, but I scaled it down to 1/2" hexies. I also added some quilting to the top!

I am really happy with how it turned out, but it took some doing! I started with some scraps of Kaffe fabric from my scrap bin:


The one on the right is the Lichen print, which is now out of production. This was my very last bit. If anyone from Westminster reads this, please bring it back! It looks a little scary on the bolt, but it is magic when it's cut.

The green on the left, by the way, was not a big enough piece, so I used a larger scrap of green Millefiore instead.

I was disappointed with how the middle fabric (it's Kirman) turned out after it was cut and stitched. The hexagon shapes are a little lost. I put that one on the bottom! The one on the right, the Lichen, came out great:


The pattern says to attach the side pieces to the bottom flower, but I could see in the magazine photos that this makes the join visible around the top. So I attached the side pieces to the top flower. Here it is with the 1/2 squares inserted between the side hexagons:


At this point I took the paper pieces out of the centre flower and sandwiched it with batting and muslin. It is quilted with #8 perle cotton. Then I carefully (!) trimmed away the extra batting and muslin:


FYI, this is my first completed, hand quilted project! It is so small that I didn't need to do a proper quilting stitch on it, but I am counting it towards my New Year's resolution nevertheless!

The big challenge was joining the top and bottom together. Holding the pieces right sides together, I first sewed five of the side hexagons into the "V"s in the bottom, and then went back and joined in the four squares between them. This left two squares and one hexagon unsewn. I took out all the paper except the ones around the opening, and turned the piece right side out.

I closed up one square and the last hexagon, wrong sides together with tiny whip stitches, removing the papers as I went. That left just one square open. Then I used a paper funnel and filled the pincushion with lentils to give it stability, removed the last paper, and whip stitched the opening closed. I'm sorry there are no photos of the final assembly, at that point it was getting late and I just wanted to finish it! However, you can see the join in the first picture, which is not really what I planned, lol!

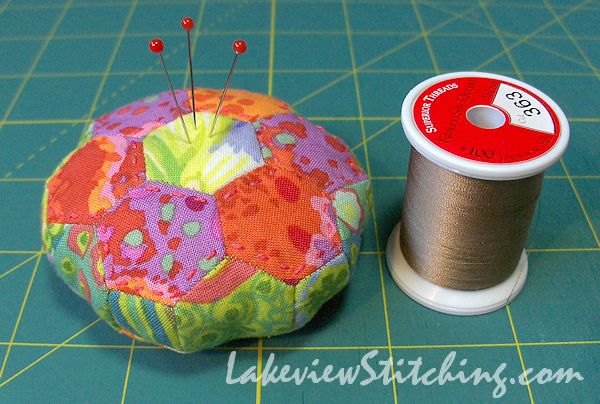
The magazine says the project can be completed in an evening, but it took me a solid eight hours. A lot of that time was spent scrounging around for materials, cutting the paper 1/2" squares, etc. The quilting was at most an extra hour. I'm sure a larger one would be easier to manage! Here's a final photo to show the scale:


What a refreshing change for me to have a quick finish!

Friday, August 16, 2013

BFF Progress

I haven't posted in a while, because although I'm still stitching away, there doesn't seem to be much to show. But, I figured I better at least show what there is, if you know what I mean. Month 1 of Best Friends Forever is coming along:


While I'm working on one motif I'll have an idea for a colour or stitch on another motif, so I've been working on them all together. But for a while now all other stitching has come to a halt, because I've become obsessed with preparing the background setting, which is English paper pieced. I've basted 60 x 2" hexagons:


I know the photo looks like just three hexagons, because I didn't want to take everything out of the bags. Trust me, there are 60 there! For Texas Star I don't pre-baste anything, it is all basted and sewn in one step. A number of these units for BFF have to be pre-basted, and I've been surprised at how fun it is! So, in addition to the hexagons, I basted a further 32 x 6 green 2" hexagon kites:


Some of the green 2" hexagon kites have already been joined up with two more yellow kites each to make these triangle units:


I've been piecing Texas Star with Superior's Kimono, 100 wt silk thread, which is completely invisible and perfect for all the different coloured fabrics in that project. But it's a strain to use, and I've been piecing this project, BFF, with regular 50 wt cotton thread instead. There are fewer colours in this project so it is easy to match the thread to the fabric. It is SO much easier to use! I think that's part of the reason I've been doing so much of it lately.

Somehow I managed to precut too many of the green pieces, and not enough of the yellow pieces, so I'll have to scrounge some more yellow from my stash down the road. But I have plenty to keep me busy for a while yet!

Wednesday, July 17, 2013

Best Friends Forever

I mentioned a while ago how much I loved this hexagon stitchery quilt design, Best Friends Forever, by Australian designer Rosalie Quinlan. My first instalment arrived yesterday, and I have already started it!


This project has surpassed my expectations, which is really saying something, as they were pretty high! The pattern covers are nice enough:


But I was particularly impressed with the printed linen patterns:


I was worried that the linen would be too fine and sheer, but it is actually quite solid and has a nice weight. The overall piece is a good size, 17" x 21". The individual patterns will fit exactly on my 3.5" (7" across) hexagons that I bought for this project. It was a bit of a gamble to buy them before the pattern arrived, but it worked out perfectly! The pattern calls for a quilt-as-you-go technique, but I have a fancier, English Paper Piecing design in mind. You know I can never do a project as written!

These are the stitchery colours I've chosen so far:


You can see by the revisions on the card that I've already changed my mind about a couple of the colours. It is interesting how different they look stitched versus in the skein.

I also put away the stitching instructions early on. The pattern uses chain stitch on the heavier lines, which I haven't done before but really liked. I have used it on the bird below. Most of the rest calls for back stitch, which I don't much like. I will use it on the lettering, but on the tree and leaves I used my favourite, stem stitch. The flowers were supposed to be satin stitched, but I was thinking about blanket stitch pinwheels on another project, so I decided to try them for the petals here as well. I think they worked great, so I think they will be my standard for all the flowers. The flower centres are a ring of tiny chain stitches.


Because the pattern is quilt as you go, it calls for a lightweight fusible batting to be ironed on the backs of the stitcheries before stitching. When I can, I prefer to avoid fusibles, and I think it is going well without it. You can see the linen is wrinkly because I have been embroidering in hand, but there is no problem at all with the fabric puckering or pulling. It is really very nice linen, I am so pleased with it!

After working on my Sweet Hearts redwork for so long, which is on lightweight muslin and much more detailed, this project is a breath of fresh air! I sense an obsession coming on...

With this post I am checking in again with The Needle and Thread Network, and WIP Wednesday #99. I will have to see if I can do something special for #100 next week!

Thursday, November 1, 2012

Auditioning Backgrounds for the Hexagons

The new design for my hexagons has wider borders, so it is not going to fit onto a fat quarter any more. Yesterday I was auditioning backgrounds. My original plan was to use this fabric from my stash:


When I was redesigning it, though, I kept thinking of a wood grain fabric that Connecting Threads used to have. I liked the idea of the flower vine "climbing up" a wooden wall. But, it's all sold out now, so I found this striped fabric that I hoped would give a similar effect:


And then, lo and behold, after I ordered the stripe, I found a yard of the wood grain fabric in my washing pile! I forgot that I bought it. Here it is:


It is interesting what a great design tool this blog is. When I started to write, I was sure that the stripe would be the winner. I thought the wood grain was too dark and it didn't really "read" as wood. But now I am not so sure! The first one is definitely out, now I am seeing a greenish undertone in that one that leans too far in the dreaded "baby poop" direction. But I think I'm on the fence between the wood grain and the stripe.

What do you all think?

Wednesday, October 31, 2012

New Plan for the Hexagons

Remember this?


We all had a debate back in June about the half hexagons along the sides. I finally decided to take out the ones in the corners, but leave the rest. They were not easy to remove, which reassures me that the whole thing will be very sturdy!

My plan at the time was to put this panel in the centre of an appliqued border from Lori Smith's book, Fat Quarter Quilting. This is the quilt I had in mind:


Part of the delay, though, has been that while I really like the idea of the vines and birds, I don't love the flowers themselves. This month I started to play around with something that I might like better, and this is what I came up with:


This is just a little sketch on a 4" x 6" notepad. I have found that it is much easier to make a small sketch, and then enlarge it all later. Also, with these notepads the paper is thin enough that you can put a previous sketch underneath and trace the parts you like and revise the rest. I went through three iterations on this with very little fuss. I did the same thing when I made the template for the flowers.

I thought quite a bit about making the flowers in the borders from hexagons too. I figured that using hexagons that were half the size of the ones in the centre panel would be the right scale. Those hexagons are 3/4", so the flower hexagons would be 3/8". I actually like the challenge of using the small pieces, but when I auditioned some hexagons beside the centre panel, it all felt too stiff. It's just too much, and I like the contrast between the symmetrical hexagon centre and the looser, "fluffier" round-petaled flowers better. I don't have a photo of that, unfortunately. You will have to take my word for it!

Tomorrow I'll show you my debate about the background fabric.

Thursday, June 7, 2012

Hexagon Hiccup

The centre panel of my little wall quilt is finished:


But it's not going to stay this way!

My original plan was to square up this centre panel by sewing straight borders over the wobbly edges, and then applique the borders.  However, there was a problem with that.

As I described earlier, I have been basting and stitching the hexagons in one step and with one length of thread.  This works great and I still love this method.  The catch, though, is that you cannot remove the basting without unravelling the whole thing.  Why would I want to remove the basting?  Because I want to open out the seam allowances to attach the borders.

I could just sew over the folded seam allowances, but I think that will add a lot of bulk, especially along the top and bottom, which will interfere with the applique.

I was explaining my problem to my parents and showed them the work, and they were amazed that I wanted to cover up the nice shapes of the hexagons at the top and bottom.  I realized they were right!  I have already modified the original pattern, so why not keep the hexagons whole and applique the centre panel on top of the borders?

So the half hexagons in the corners are definitely history, and I am also considering removing all the halves along the sides.  Plus, this will be great practice for my Botanic Roses quilt, because I have already decided to applique the centre to the borders on that quilt.

The funny thing is that as soon as I started to fill in all the half hexagons along the sides, something felt wrong.  Now I feel back on track.  But I don't think I would have understood the problem until I went a ways down the wrong path.  Live and learn!
Related Posts Plugin for WordPress, Blogger...