Tuesday, February 23, 2016

Mod Trips Finished

First finish for 2016! This is my version of Bonnie Hunter's Scrappy Trips Around the World. I call mine "Mod Trips."

Mod Trips, 60" x 60"
I started this project on a snowy day in February, three years ago. No snow today! But, it's predicted again for tomorrow.

My goal with this quilt was to make a version that was different from all the others out there. I think I succeeded!

It is straight-line quilted in a diamond pattern on my home machine with the walking foot:


I didn't mark it, just sighted along from corner to corner by eye. There was 28 wt white Aurifil thread in the top, and 40 wt in the bobbin. I used a longish stitch ("3" on my machine, and I usually piece at around 2 1/4), and I was happy with how that looked.

But it was not smooth sailing! I was very tempted to title this post...

Dratted Walking Foot


Three weeks ago I had about a third of it quilted, but the back looked like this:


You can see I originally planned twice as much quilting. But, why was it getting all bunched up like that? First, I thought I did a poor job basting it, because I had to do it on a smaller table than before. Or, somehow the fabric stretched out.

Eventually I realized the problem was the feed dogs. I had them on the highest setting, and they were pulling up the back as they worked. My machine has a pin feed, so I switched to that. Then everything flattened out and the walking foot chugged along beautifully.

But, I couldn't have half of it bunchy, and half of it flat, so I spent a day and a half pulling out all the quilting and re-basting it. I was very glad I'd used a longer stitch!


Except for a little cross in each corner, I decided to leave the quilting at every other row the second time.

It's been so long since I finished something, that I totally forgot how fun it is to sew on the binding! It really is satisfying to wrap up all the raw edges and close out the project.


I don't know how practical this scrappy white binding will be, but it felt like the right choice.

So, yay! One done. The pillows are also quilted, but still need backs and binding. To read all the posts about this project, please click here.

Although I didn't make any formal New Year's resolutions this year, I do kind of have one:

One old
One new
One flimsy
One quilt

Since this is an old project and now a finished quilt, I'm free to start something new! And yes, I already started today:


It is so nice to get the walking foot off the machine, and get back to regular sewing!

Sunday, February 21, 2016

World of Inspiration

I am in great danger here of sounding like I am stooped over and creaking out, "when I was young..." I will try to keep it in check!

But I do think it is older generations who can best appreciate how dramatically different, and improved, life is now. Personally, I love the "United Nations" of stitching that we have available to us these days. It is so interesting to see what stitchers around the world are making, and get a glimpse into how they live.

Clicking through some of the blogs I follow, I came across the brilliant work of Russian quilter Ksenia Shlyakova:

"Snow Queen" by Ksenia Shlyakova
used with permission
It is a long time since I've shown other people's work on my blog, but Ksenia's quilts inspired me so much. And so does Ksenia! She is 22.

Here comes that creaky voice. What were you doing at 22? I was coming to the harsh realization that after four years of grinding through a science degree, the last thing I wanted was to spend the rest of my life in a lab. Several more years of "finding myself" ensued. Ksenia studied lace making at her art school, but realized after graduation that her passion was making these stunning art quilts, and she dove in and works on them full time.

I still can just hope that I may do something as good some day, but the thing that inspires me the most is Ksenia's commitment and focus. I love to read about people who are completely committed to their art or craft, and when that art is quilt making, that 's even better! It really motivates me to dig in deeper.

Click here to read the whole article, and see several more of Ksenia's quilts.

Don't read Russian? I certainly don't. Google's Chrome web browser will translate it for you. After the web page has fully loaded on your computer, you will see two small dark squares appear in the upper right corner:


Click the squares and the page will magically translate for you. Brave new world! (...creak...) Some pages translate better than others, I've found. Ksenia's name is spelled a few different ways, and the gender shifts around (the author's name is Alexandra), but it's still relatively easy to understand.

Don't have Chrome? It is a free download here. Blogger works best with Chrome. But in any case, the photos are universal.

I am always interested to see where my photos end up as well. My favourite is this South Korean website, which used my very first practice bullion rose, done on scruffy muslin and a little unravelled at the top, in their stitch dictionary! Well, I was pretty proud of it, I must admit. And I appreciate all the traffic. :D

Thursday, February 11, 2016

Old and New Stars

...or "This and That"
...or "Still Sewing, Thanks!"

I know I've been absent from the blogosphere for a while, but I'm just resting my typing joints again. I've still managed a little sewing!

I put together two of the enhanced star blocks for Bonnie Hunter's Allietare:


Now it is just the steady work of putting together all the remaining Allietare blocks.

For a change of pace, I tried out one of the "feature" stars from Sue Garman's Stars for a New Day:


I'm going to be making dramatic changes and simplifications to Sue's design on this one. The fabric I bought for this project has a very low thread count, and a fairly large printed design, so I've decided to enlarge all the feature blocks from 6" to 9". That's a 9" block above, and you can see how much it is fraying, even with minimal handling. It's also quite stretchy. Sue's pattern uses mostly paper-pieced HSTs. My plan is to reduce the number of seams, and use the F&P half and quarter square ruler (that I bought for Allietare) to cut and piece it traditionally. It worked well enough.

Despite the low thread count, I still really like the fabric. I know that with washing it will get nice and soft, and a cozy brown quilt for late autumn is what I have in mind. Scaling up the blocks means I'll need fewer for a queen-size quilt, and a couple of the borders have to be eliminated too. So hopefully it will go fairly fast! (Once I finish all these other things...)

And, I've also finally finished off these old star blocks:

Mysteriously out of focus
Truly, a "soft focus" is a blessing on those blocks! I realized over the holidays that this is now my oldest UFO, started in November 2010 and intended as a Christmas present that year. Chuckle.

I've been itching to clear out some old projects, and this one is maybe a day and a half away from a finished flimsy. Each block will get a jade green border...


...and then the eight blocks will be set with some wintry sashing and borders and it'll finally be done! So as usual I am spoiled for choice around here. I've noticed that every winter and summer I'm in the mood to finish things, and every spring and fall I tend to start a bunch of things. So I'm hoping to make room for the new projects that are inevitably around the bend!

Monday, February 1, 2016

Butterflies


I know it looks like I've done very little hand stitching since my summer break, but it's not true! It's just that most of my hand stitching time has gone into my English Paper Piecing project, Texas Star. I'll be glad to see the end of that one!

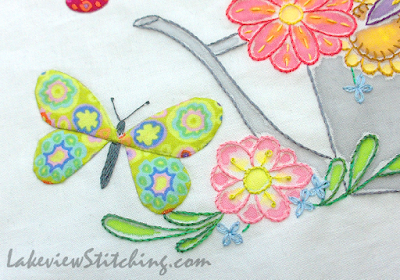
I've been dying to get back to some embroidery, so when Ann (Fret Not Yourself) mentioned that she and Cathy (Sane, Crazy, Crumby Quilting) are doing a Kaleidoscope of Butterflies link up this week, I immediately thought of this project, Down in the Garden by Leanne Beasley. (Click here to see all the posts on this project so far.) Last spring I finished the four birdhouse stitchery blocks, and the large centre panel is also stitched. Now I have the four watering can blocks to do. I finished the first one yesterday:


The big hold up on these has been the needleturn applique butterflies. You can see that I fussy cut the wings from a variety of Kaffe fabrics -- Roman Glass, Millefiore, and Paperweight. So that is a little trickier, but the main challenge has been the applique stitch. I want it to be invisible, and after some trial and error I settled on ladder stitch with 100 wt silk thread in light grey. I can't do more than one butterfly a day. And then I wonder if it's worth the effort, and that slows things down more. But, now that I look at it again, I do think it's worked well.

Once the applique is done, it's a relief to fill in the rest of the stitching:


In some light it seems to me that the Tsukineko ink that I used to paint in the design is starting to fade. I don't mind, because I do want the stitching to stand out. But as I write this, I'm thinking that maybe it's just the white fibres in the Kona PFD fabric that are starting to get fuzzy while I stitch. I will say the fabric is really holding up well to stitching. I don't use a hoop, and it hasn't puckered at all.


Who knows? If the butterfly link up continues, I may get the next three blocks done too! Two butterflies per block. In the meantime, you can see a whole variety of butterflies in the Kaleidoscope of Butterflies right here. Gotta love that name!

Saturday, January 30, 2016

Picnic Flimsy


The Ad Hoc Improv Quilters link up is on again! Like Audrey, this week I have been diligently sewing the improv quilt I started in November. I finished the flimsy today!

At about 86" x 93" (218 x 236 cm), the darn thing queen size quilt is too big to photograph in one piece. This is almost all of the centre:

Modern Utility Quilt #1, "Picnic"

And this is the border fabric I chose:


The white dots are 1" (2.5 cm). I was thrilled to find something that matched the colour and scale of the blocks so well! The fabric is a Riley Blake wide back, which conveniently let me cut the borders in one piece. And it will conveniently be the back, too. After much thought, I decided that the most forgiving way to cut and sew the border would be to have about 3/4 of a dot showing on the inside and outside edges.

Since the quilt is "improv," I was unsure if I should sew the blocks with matched corners. At first I thought I wouldn't worry about it. But then I decided that I would quilt it myself on my home machine. So I thought it would be better to match the corners, spin the seam allowances on the back, and reduce the bulk in the corners.

In December I finally bought Sujata Shah's book Cultural Fusion Quilts. This quilt is inspired by the "Windmills" quilt in that book, although I see now there are quite a few differences in mine. But, Shah also matches the corners on her blocks!

I know most of my regular readers bought the book long before me, but if you haven't, you should! It is excellent, and I have more projects planned that are inspired by Shah's techniques.
So, this is my first improv flimsy, and my first bed-sized flimsy! To read all past and future posts about this quilt, please click here.

I do plan to quilt it myself, but I have many others to get through first, so it likely won't be until the fall. After my big "scope creep" insight during Allietare, I've simplified my plans for the improv letters that I made last fall. At some point I'll get back to those, and I have a couple more ideas that I'd like to get started. Right now, though, I am quilting Mod Trips, and then I really will finish Allietare.

In the meantime, check out all the other great posts at the AHIQ link up here. I highly recommend Cathy Perlmutter's post, which you can read here. If you are wondering how to get started with improv, Cathy will get you going! Or at least, laughing. :D

Monday, January 25, 2016

Allietare Stars

All those Allietare Week 4 sets that took me so long to make, will be used to make black star blocks. Here are my 25 sets, laid out and ready for their centres:


Bonnie Hunter's instructions call for 4" squares of our gold fabrics in the centre. I decided to make 4" gold stars instead:


My theory was that with the large variety of gold, taupe and brown fabrics that I've been using, sewing them into stars with a consistent background would give them some uniformity, and hopefully a little pizazz too!


Some of them are quite a bit darker than I expected.


It's funny how my camera sees those blues differently on different days! Anyway, some of these stars are a little risky...


...but I hope they'll be fine in the end!


Now the layout for the 25 star blocks is also done:


It is all darker than I expected, but....I think once the blocks are all sewn together the blues will tie in well to the blue in the red blocks. In any case, I'm not changing my mind now!

I think sewing them together will keep me busy for a while. :D

And today I'm linking up with Design Wall Monday at Patchwork Times. Click here to see what everyone else is up to!

Saturday, January 23, 2016

Cheating

Today I have a choice of musical accompaniment for you! Vintage:


Or new:


Cline's voice is just liquid, but personally I think the second track is a good cure for the first! It's not healthy to spend too much time that blue. :D

But, why am I writing about cheating today? Because I've done a lot of things that aren't Allietare, that's why!

It started with those Hourglass leaders and enders. I forgot how long it takes to prep them for sewing! With the first step done, now I have to cut them apart, iron them open, and draw the line for the second step...


...300 150 times. (300 blocks, 150 sets.) And then I realized that I should keep up with the final cut and iron too...


...so I don't have it all left to do at the end. So, the leaders and enders did get me a little sidetracked, and they're not quite as unobtrusive as I first thought!

To clear my head, I sewed four more rows on Aloha Kisses:


Then I thought that if I'm going to cheat on Allietare, I should do something that really needs to be done. So I finally sandwiched and pin basted Mod Trips:


That's a very traditional back for a modern quilt! I was going to make a pieced back for it, but when the mood struck me to baste it, I didn't want to stop and make the back. So this is a wide back that I bought for something else. Now I know that if I have a specific desire for a pieced back, I should make it at the same time as the front!

AHIQ is next week again, so I've also been making a push on the "modern utility quilt" I started in November:


I am definitely naming this one "Picnic." This week I joined the rows in pairs. Then I just have to sew together the pairs, and add the border.

Next, while I was working on Allietare in December, I decided to join in my guild's Crayon Challenge. This is the crayon I got:


Long time readers know that I have a blindspot in the fabric store when it comes to purple, and I have hardly any in my stash! But, it was a good excuse to shop. The idea of the challenge is to use a wide range of values in your colour. These finally arrived this week:


They are gorgeous! I already have all the blocks made, and the layout finalized. Now I'm afraid that's the last you'll see of it until after the last guild meeting in May.

I also received my Kaffe border fabrics for Allietare. They are gorgeous too! In fact, I like them so much that I decided to make the borders wider, and cut a row of blocks. Instead of a 5 x 6 layout of the black star blocks, I cut it down to 5 x 5. Now I only need 25 black star blocks, and 16 red blocks.

Reducing the number of blocks, however, has not saved time. I felt it would be a good opportunity to "optimize" the blocks, and make sure that my most favourite fabrics stayed in the quilt. The red blocks went back on the wall:


The four finished blocks are on the left, and I chose my favourite pieces for the last 12 on the right.

I also had to optimize the fabrics for the black star blocks. It turned out that most of the Week 4 sections with blue backgrounds, like this...


...were the ones that didn't make it into the quilt. Now that the mystery has been revealed, I see that the white backgrounds work better there. So that is one advantage of being slow!

Now, all the Week 4 sets are done:


Next week I will finally get to the layout of the black star blocks. I'm hoping that once all the decisions are made, it will go fast from there!

I certainly recognize that all this fiddling around with the colours and layout slows down the finishes. But, I have also realized that the opportunity to play with the colours and patterns is the main appeal of quilting for me. So as the saying goes, I'll keep "following my bliss!"

Saturday, January 9, 2016

Allietare Red Blocks


Well, this is the last link up of the main phase of Bonnie Hunter's 2015-16 mystery quilt, Allietare. I feel like I've been working steadily since the reveal on New Year's Eve, but I don't have a lot to show for it yet. I do have a random selection of photos and reflections on the whole mystery process, and I hope they'll be in some kind of order by the time I finish writing!

While many people have already finished their flimsies, as you can see in the link up here, I know many more have not, so I don't feel too bad about that. I hoped the challenging pace of the mystery would shed some light on why all my projects take so long. It sure did! My lesson about scope creep, which you can read here, has led me to rethink many of my projects.

I admit there is some more scope creep happening now. But I hope it's justified! Fussy cutting many of the red squares, which you can see here, was one extra bit of work. The other "issue" is these star blocks:


I folded up one of my gold fabrics just to lay out the block, which is why it looks lumpy. Fortunately, I don't like the way it looks at all. The bright gold makes the red look dull. And in other blocks, the bright reds make the golds look dull. So, I say fortunately, because now I have the excuse to make the pieced centres that I wanted to make before the final reveal.

It's funny, too, because I went to so much effort to make sure the reds and golds looked good with my blue batik, but I didn't consider how they looked together! So, that's a hint about where things are going, but you'll have to wait until the next post to see the outcome. :D

Even though I don't like my golds with my reds, I was surprised at how nice the block looks when all the light backgrounds match:


I won't be able to do that every time, but it will be a fun thing to keep in mind when I finally lay out the star blocks.

Laying out all the red blocks was the big job this week. First I put all the Week 2 matched sets up on the design wall. Then I put in all the centre squares:


It seemed ok at first, and I thought that was pretty easy. But then I added all the corner units, and a lot more tweaking ensued! Some blocks never changed, and some changed several times:


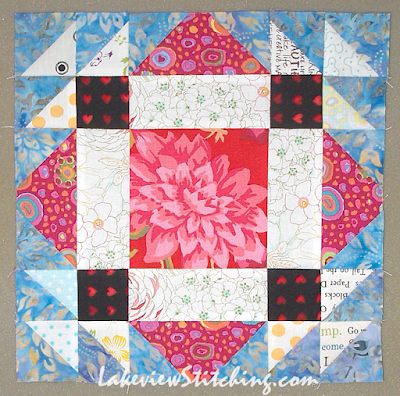
My goal was to show off the fabrics to their best advantage. As I learned with the stars, not every Kaffe fabric looks good beside every other Kaffe fabric! But I think I got there. I quite like this combination of the Herringbone and Shirt Stripes patterns:


I also lucked out with those red hearts -- I think they tie into this block perfectly. It felt a little lazy to cut all those black squares from the same fabric, but it really worked well this time.

I wanted to use that same red hearts fabric for the black border, but I couldn't do it without making the border a lot narrower. So I went online. Both the Herringbone and Shirt Stripes shown above come in a great dark blue that would have been a nice, calm finish for the quilt. In the end, though, I went with a more exuberant scheme. I can't wait to get the package and see how it looks!

In the meantime, there is still tons of sewing to do:


After these 20 red blocks, I have all 30 of the star blocks, with many Week 4 sets still not finished, and the extra piecing as well. Plenty to do! But, I am sticking with it until it's a flimsy.

Overall, this mystery has been a great experience, and I really appreciate the time Bonnie takes to publish this free design and organize the link ups each week. It's like a design workshop where everyone else does the work! It's so interesting to see all the different variations. Even though I'm still sore, I would certainly consider doing another in the future. I envy those quilters who can sew all weekend! "Run your own race," is what I keep telling myself.

And even though the link ups are over, I'm sure I'll have plenty more to share. (Edit: Click here to see all the Allietare posts before and after this one.) I know I've added a few more followers, so welcome! I'm sure everyone can squish up to make room for a few more. :D


Saturday, January 2, 2016

Finally Fussy Cutting Allietare!

At the same time that I was writing my post for Week 5 of Bonnie Hunter's 2015 mystery quilt, Allietare, Bonnie went ahead and did the final reveal early! For the next few weeks you can see it here. I had already figured out that we would need some type of 4" square in the middle of all the blocks, and I had my heart set on some fancy piecing in there. So I was actually a little disappointed when I saw they would be plain 4" squares. But then I came to my senses! I realized that those big squares were the perfect opportunity to do the fussy cutting that I decided against in Week 3:


This was my chance to showcase all those larger prints from my collection of Kaffe Collective fabrics. So, first thing yesterday morning I hunted high and low through my stash for everything Kaffe and reddish.


Some things I knew I had, but were hard to find, and some things were a nice surprise. In Week 4 I was sighing over my last strip of red Kirman. Yesterday I found almost a yard more!


These red squares will be used in 20 of the Allietare blocks. When I finally rounded them all up, I had more than 20. Charms!


I laid out a couple of blocks to see how they will look. I think this combination will be too tempting to resist:


And, best for last:


It's like this quilt was designed for my stash. I am so amazed at how well it's all coming together! That first flash of inspiration to use my Kaffe fabrics, based on Bonnie's photo of the gold hotel walls, has totally paid off. I'm glad I listened to it!

Now I am loaded with fun things to do. Soon I'll get these 20 red blocks up on the design wall to find the best points for each middle. And I am still making the Week 4 "bowtie" units, after I had to take a rest that week. Only 8 sets are done -- 22 left! I really like the shape of those, and they go together well, so I will probably do that first.

We certainly won't be looking at a flimsy here on Monday. But, I'm going to stick with it until it's done!


Related Posts Plugin for WordPress, Blogger...